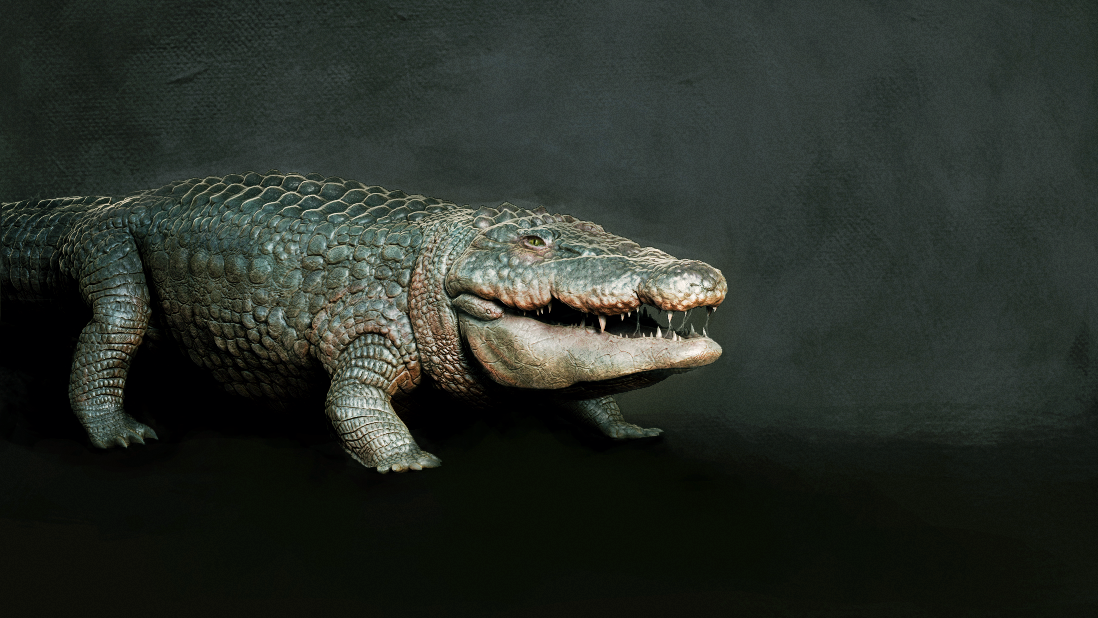
Crocodile Sculpt
I embarked on a project for my ZBrush class that truly tested and expanded my skills as a digital sculptor. The goal? To create a detailed crocodile model from scratch—a process that combined meticulous planning, creative problem-solving, and countless hours of sculpting.
I began by gathering plenty of references to ensure I had a strong foundation to work from. Reference images are such an essential part of the process—they guide everything from anatomy to textures and even the finer details. With these references in hand, I jumped into ZBrush and used the ZSpheres tool to block out the primary shapes of the crocodile. This initial phase is all about nailing the proportions and flow, ensuring the model feels balanced and natural.
Once the basic form was in place, the real work began. I started sculpting in the details, gradually increasing the subdivisions to refine the scales, wrinkles, and other textures that make a crocodile so iconic. This part was incredibly time-consuming, but I honestly didn’t mind. I’ve always loved the hands-on nature of ZBrush sculpting—it’s where the magic happens, and it’s so satisfying to see your model slowly come to life.
When the base sculpt was ready, I turned my attention to finding the perfect alphas and textures for the crocodile’s scales. I scoured the internet for resources, saved my assets, and imported them into ZBrush. This is one of my favorite stages of the digital sculpting process because it’s where the model truly starts to take shape. Applying those intricate scale patterns and watching the crocodile’s skin gain depth and realism is an incredibly rewarding experience.
Next came the poly painting. At the time, I hadn’t learned Substance Painter yet, so I relied on ZBrush’s PolyPaint tool to add color and gradients to the model. I studied crocodile references extensively, focusing on capturing the earthy tones, subtle color transitions, and natural patterns that make them so visually striking. With each brushstroke, the crocodile’s personality began to emerge.
Once I was satisfied with the painting, I moved on to lighting and rendering. I experimented with different setups, tweaking the render settings to highlight the textures and bring out the details. I exported multiple render passes as PSD files—probably around 15–20 in total—along with various matcap materials.
The final step was compositing in Photoshop. I brought all the PSD files together and began layering and blending the materials to create a polished final image. It was like piecing together a puzzle, balancing highlights, shadows, and textures to achieve the perfect result. To tie it all together, I added a custom background using a concept brush, giving the finished piece a sense of atmosphere and context.
For elements like the teeth and eyes, I modeled them separately from the main body, ensuring they had the detail and precision they deserved. These smaller components might seem minor, but they play a huge role in making the final sculpt feel complete and lifelike.
Looking back, this project wasn’t just an assignment—it was a labor of love. It challenged me, taught me new techniques, and reminded me why I’m so passionate about digital sculpting. Even now, it remains one of my favorite creations, and I can’t wait to dive into more projects like this in the future.